paper-rainbow-setup

paper-rainbow-setupWant to get pleasure from natural rainbow colors? But you don’t want wait for rain. By knowing science you can. In this home experiment, we are going to make a rainbow on a paper by applying the same principle that a real rainbow follows. Except that, our homemade rainbow won’t be an arc.

Things You Will Need

  • Small size mirror
  • Frying Pan (or any other similar to it)
  • White paper and Sunlight

How to Make

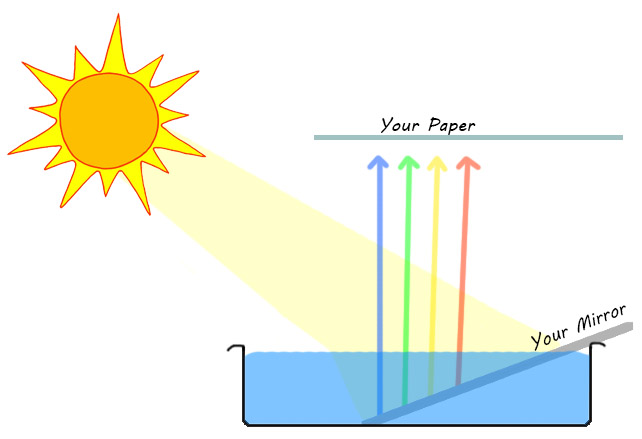
  1. Fill the frying pan with water.
  2. Clean the surface of the mirror and place it in the pan at an angle below the surface level of the water.
  3. Place your pan in sunlight, such that sunlight falls on the surface of the mirror.
  4. Hold a white paper above the pan to catch the reflected rays of the mirror.

If your setup is correct, then you should be able to watch rainbow colors on paper. If not, try to change the angle of the mirror in the pan until you see colors.

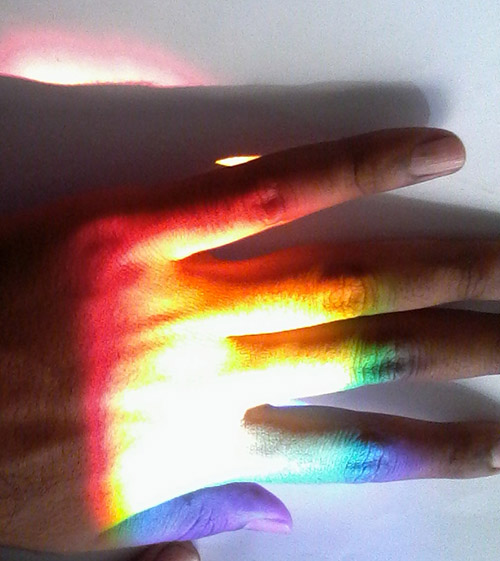
I have taken some picture on my paper and on my hand.

rainbow-on-paper

rainbow-on-hand

Watch the video of Rainbow on paper below

How to Works

When you shine sunlight on the mirror, light first enters into the water and refracts (bends). Since sunlight is a mixture of visible colors each color has its own frequency and wavelength. So, these colors refract at different angles and get separated from each other. These separated colors are reflected from the mirror on the paper.

Try it

  1. Try using a large mirror in the water tub and note the results. Does it affect the formation of the rainbow?
disc-hovercraft

disc-hovercraftA hovercraft is also called Air-Cushion-Vehicle (ACV). It uses a blower to create air currents beneath itself. Resulting in the formation of air cushion that slightly lifts the craft upward. This upward lift reduces the friction of hovercraft with the surface on which it moves. Also, the lift allows it to move freely in any direction when pushed. We will build a model of hovercraft out of home materials, and this it will use the same principle.

Things You Will Need

  • 1 Balloon
  • CD or DVD Disc
  • Cap of a plastic bottle
  • Penknife
  • A Glue gun

How to Make

  1. Make a small hole in the center of the plastic bottle’s cap with a penknife (Be careful).
  2. Cover the center hole of the disc with bottle’s cap by putting it on top of the disc. Then, apply some glue to make air-tight contact. But, don’t apply glue on the hole of the cap.
  3. Blow up the balloon and pinch its mouth.
  4. Fit mouth of the balloon over the cap and release it.

Your hovercraft is ready and working. Put it on a smooth surface, and push it in any direction you want. It will go there smoothly.

How it works

Air from the balloon passes through a hole in the cap. Then, it flows beneath the disc creating an air cushion that slightly lifts the disc up. As a result, the friction between surface and disc reduces. This reduced friction allows the hovercraft to move freely in any direction where it is pushed.

Try It

  • Use large size balloon, instead of small size balloon.
  • Make two more holes in the disc and cover each hole with a cap. Then, blow three balloons and fit them to the caps (This is easy with three people each handling one balloon).
  • Try to land your hovercraft on water and sand.
  • Check out! How much weight your hovercraft can lift. Try with paper clips, pencils, and rubbers.
  • Think! What can you do to increase the payload capacity of your hovercraft?
boil-water-in-paper-bag

boil-water-in-paper-bagIn the ancient time, before the invention of metal and clay pots. Humans have been boiling water in large cup-shaped leaves. So, this is an old method of boiling water. But, just for fun and learning how it works, we will boil water in a bag made out of paper.

Precaution: Always wear safety goggles and hand gloves when dealing with chemicals. Also, take the permission from your parents for the experiment, or involve them.

You will Need

  • Paper (for making the bag)
  • Scotch tape
  • A gas stove

What to Do

  1. Make a simple cup-shaped paper bag with the help of scotch tape. But remember to keep the bottom area of the bag larger than the area of the fire of your gas stove.
  2. Put your bag on the gas stove, and fill the bag with some water to boil.
  3. Start fire gently, and keep its flame-level lower than the corner and sides of your paper bag. Otherwise, sides of your bag may burnout.
  4. Wait until water starts to boil. If you have a household thermometer use it to check water temperature to find out how fast the temperature is rising.

What is Happening?

You may wonder how a thin sheet of paper has survived the hot flame. It is because the paper has the ability to absorb water. When you have poured water into your paper bag, it absorbed some water. This absorbed water prevented the bag from burning in the flame. But, the flame was keeping the paper dry to hold the water. In this way, the water that became hot went to the surface and cold water took its place. This process continued and water started to boil, as the temperature reached the 100 Celsius.

volcano-experiment

volcano-experimentIt is an ideal home experiment and science fair project. In this experiment, you will learn how lava is ejected from a volcano, and about the chemical reaction of vinegar and baking soda. We will use the materials from the kitchen to build a model of a volcano. It will look like a lava erupting mountain.

Precaution: Always wear safety goggles and hand gloves when dealing with chemicals. Also, take the permission from your parents for the experiment, or involve them.

Things You Will Need

  • Baking soda
  • vinegar
  • empty plastic bottle
  • clay or wheat flour
  • cardboard sheet

How to Make

  1. Place the cardboard sheet on a clean surface, and put the empty plastic bottle on the center of the sheet.
  2. Use wet clay or wet wheat flour to cover the plastic bottle. Try to shape the clay like a rough mountain, and place stones around it. Be careful, clay/wheat flour should not be dropped inside the bottle, and also don’t cover the opening of the bottle.
  3. Dry your structure in sunlight until it is hard to break.
  4. Add 2 to 3 spoonful of baking soda and 4 drops of red food coloring in the bottle that you have covered with clay.

Your Volcano is ready for eruption!

Take your model where you want to perform it, then add some vinegar in the bottle to start the volcano. You will see, a red fountain of foamy liquid will come out of the volcano model.

How it works

When baking soda (sodium bicarbonate) and vinegar (acetic acid) are mixed, they react with each other. As a result, gas bubbles made of carbon dioxide are produced. These bubbles build the pressure inside the bottle. This pressure force the foamy liquid out from the bottle.

Try it

  1. Use different quantities of baking soda and vinegar with different colors.
  2. Use three bottles in the place of one with three different colors (Red, Green, and Blue).
  3. Use glowing ink or powder with food coloring.