Foamy Fountain

Foamy FountainYou may have seen the water fountains at many parks. These fountains give us very good view parks. So, let’s make this interesting fountain at home. This it will be colored and made of foam. We will call it the foamy fountain, and enjoy its beauty!

The foam that will be produced by the fountain is special because each bubble is filled with oxygen gas. You will also learn how this fountain works and what science is behind it.

Precaution: Always wear safety goggles and hand gloves when dealing with chemicals. Also, take the permission from your parents for the experiment, or involve them.

Things You Will Need

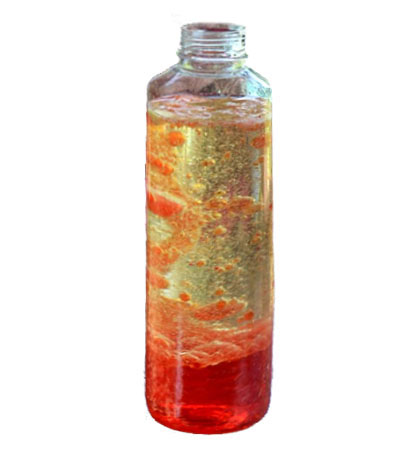
  • Empty plastic bottle about 500ml (half a liter) in volume
  • A half cup of Hydrogen Peroxide (20-volume or 6%)
  • 1 Tablespoon of Yeast
  • Liquid dish soap
  • Food coloring (Red, Green or any color)

How to Make

  1. Pour ½ cup of hydrogen peroxide in the bottle. Be careful! When dealing with hydrogen peroxide. It can irritate the skin, so it will be advisable to get the help of an adult.
  2. Add few drops of food coloring of your choice into the bottle.
  3. Add 1 tablespoonful of liquid dishwashing soap into the bottle.
  4. Close the bottle with cap, and shake it so that all the liquids mix together.
  5. Take a cup and add 3 to 4 tablespoons of water and 1 tablespoon of yeast in it.
  6. Stir the cup with a spoon to mix the water and yeast together.

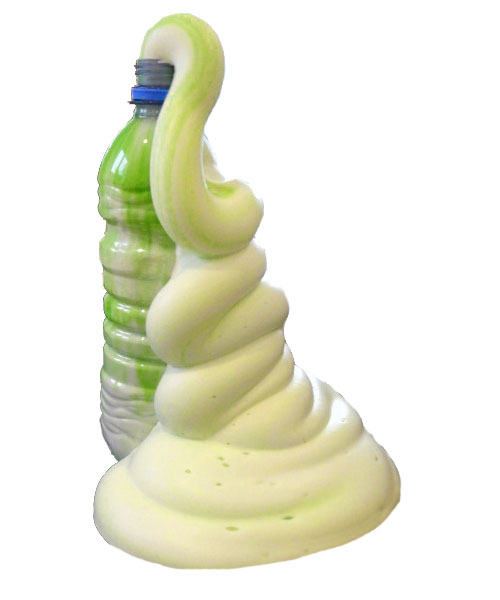
Your fountain is ready!

When it is time to start fountain, just add water-yeast mixture into the bottle and BOOM!

Note: Fountain will expel-out the foam so you should do this experiment at the washable area of your home.

What is Happening?

When you add the yeast into the bottle which contains the hydrogen peroxide, the breakdown of hydrogen peroxide takes place. The hydrogen peroxide is broken down into water and oxygen gas. The sudden release of oxygen in the bottle causes the bubbling. Because bottle contains liquid soap. These bubbles rush out of the bottle due to the formation of new bubbles. This will until the breakdown of hydrogen peroxide will take place.

Try It

  1. Increase the amount of yeast added to the bottle. Find out, does it affect the rate of reaction?
  2. Increase the amount of Hydrogen Peroxide and also add some water to the bottle. Find out, does it affect the timing of the fountain?
  3. What can you do to increase the height of the fountain? Think about it.
Soap-boat-in-the-water

Soap-boat-in-the-waterUsing detergent to power a boat is a fun science experiment. You will learn to make a boat that runs only on detergent. Find out! How surface tension of water is affected to power your boat.

Things You will Need

  • A sheet of cardboard or Styrofoam
  • Liquid dishwashing soap
  • Dropper or Pencil
  • Scissors

How to Make

  1. Cut a sheet of cardboard into the shape of a boat; it should be 2 inches long and 1.5 inches.
    Soap Boat
  2. Make a triangular shaped notch in its back (as shown in the figure).
  3. Place your boat in a water tub, so that your boat has enough space to move.
  4. Place a drop of liquid dishwashing soap in the notch of your boat with dropper or pencil.

Now, watch your boat going around the tub! It will move forward.

How it Works?

Water molecules are attracted to each other, which creates surface tension in the water. Liquid dishwashing soap is a surfactant; it breaks down the surface tension of water. When you add liquid dishwashing soap in the notch, it breaks the surface tension of water inside the notch. As a result, it creates enough force to push the boat forward. We have used light material (e.g. Styrofoam or cardboard) to build the boat. Because, light materials can be easily pushed when surface tension breaks.

Try it

  1. Use different materials to build your boat and find out! Which material provides more speed?
  2. Can you rotate your boat without moving it forward or backward? Think about it.
Homemade Lava Lamp

Homemade Lava LampLava Lamp is an electric lamp which contains the brightly colored substance. This bright substance rise and falls while changing their shape. Lava lamps give a good background decoration and grasp the attention of people. So, here you will learn how to a make lava lamp. This lava lamp won’t require electricity to operate. All the materials you will find easily in your kitchen.

Things You Will Need

  • A clear empty plastic bottle
  • Vegetable oil
  • Food coloring
  • Water
  • Alka-Seltzer tablet (tablet that fizz)

How to Make

  1. Fill the bottle about a quarter with water.
  2. Fill the remaining space of the bottle with vegetable oil, and keep it aside for 5 minutes. When oil and water become separated from each other, then proceed to next step.
  3. Add few drops of food coloring of your choice in the bottle. It will take some time to break-through the oil and the water.
  4. Break the seltzer tablet into four pieces and drop one piece in the bottle. Watch it sinking to the bottom.

When seltzer tablet will touch the water your lava lamp will start to work. When bubbles stop to form add another piece of seltzer tablet to water.

ENJOY!

How it works

When oil and water are mixed, they form two layer. The oil settles at the top, and water at the bottom. Because, oil is less dense than water, so it floats on water. When you drop the seltzer tablet to bottle it goes to water layer and starts to form bubbles by a chemical reaction. These bubbles go up taking some colored water with them. At the top of the bottle, air escapes and leaves the water behind, which falls back down. Doing so it creates a nice effect of a lava lamp that you enjoy.

Try It

  1. Try to make seven lava lamps with rainbow colors and start them at the same
upside down glass

upside down glassCan you keep the water from falling down? Let’s make an experiment using simple household materials and try to defy gravity. We will try to hold the water in an upside-down glass and keep it from falling. Also, you will understand the science behind it.

Things You Will Need

  • Empty Glass
  • sheet Cardboard (that covers the mouth of glass)
  • Water

Procedure

  1. Fill the glass with water completely.
  2. Take a flat sheet of cardboard and place it over the mouth of the glass.
  3. Hold the cardboard with the glass tightly, then quickly upside down the glass.
  4. Slowly take away your hand that is holding the cardboard.

If all goes correctly, then the cardboard will stick to the mouth of the glass. The water will not fall from it.

What is Happening?

So, you’re thinking what is happening here! It all happens due to the absence of air in the glass. As a result, the pressure of outside air is much greater than inside of the glass. So, outside is forcing the cardboard to stay in its place. Which in turn, keeps the water from falling.

Try it

  1. Try to use different kinds of paper sheets and use it in the place of the cardboard for hold the water. Observe which paper sheet is able to hold the water.
  2. Use glasses with the wide and narrow mouth, and find out which is easier for this experiment.
home-made-flubber

home-made-flubberHave you watched Flubber movie 1997? If yes, then you know that in this movie Robin William makes a green rubber-like substance named “Flubber”. In this experiment, we will make flubber (It won’t talk! SORRY!) But you can play with it. You will also understand the science behind it.

Precaution: Always wear safety goggles and hand gloves when dealing with chemicals. Also, take the permission from your parents for the experiment, or involve them.

Things You Will Need

  • Warm Water
  • 1 cups of Elmer White Glue
  • 2 tablespoons of Borax
  • Green Food Coloring
  • Airtight bag

How to Make

  1. Pour ¾ cup of warm water and 1 cup of white glue in a bowl.
  2. Add 2 to 3 drops of food coloring in the bowl and stir the mixture with a spoon
  3. Pour ½ cup of warm water in another bowl, and add 2 tablespoons of borax in it. Stir the solution to completely mix the borax with
  4. Pour all the solution of borax in the first bowl, and stir the mixture well with a spoon.
  5. Pour all content of bowl in an airtight Close the bag tightly and make sure no liquid is leaking from the bag.
  6. Knead the mixture in the bag with your hands from outside for 5 to 10 minutes.

Your flubber is ready!

You can remove it from the bag and play with it. If your flubber is sticky then let it dry a little bit, then it will be okay.

How it Works

The flubber you made is a Polymer. You made it by mixing borax and glue together. Borax acts as a connector (crosslinking agent) for the glue molecules. When glue molecules are joined together and formed a large molecule chain you got a gel-like substance.

Try it

  1. Try to make a rainbow flubber. You can make it by preparing seven different flubber, but kneading all the seven flubbers together when they are still sticky.